Security breaches in mobile apps are making headlines, and the stakes have never been higher. With over 4.5 million apps between the iOS App Store and Google Play, attackers are constantly probing for vulnerabilities. A single security flaw can expose user data, damage your reputation, and result in regulatory penalties under Australia’s Privacy Act.
The OWASP Mobile Top 10 provides a critical framework for understanding and preventing the most common mobile security risks. As mobile developers, we need to build security into our apps from day one, not bolt it on as an afterthought. This guide walks through the essential security practices for both iOS and Android, with practical code examples you can implement today.
Understanding the OWASP Mobile Top 10
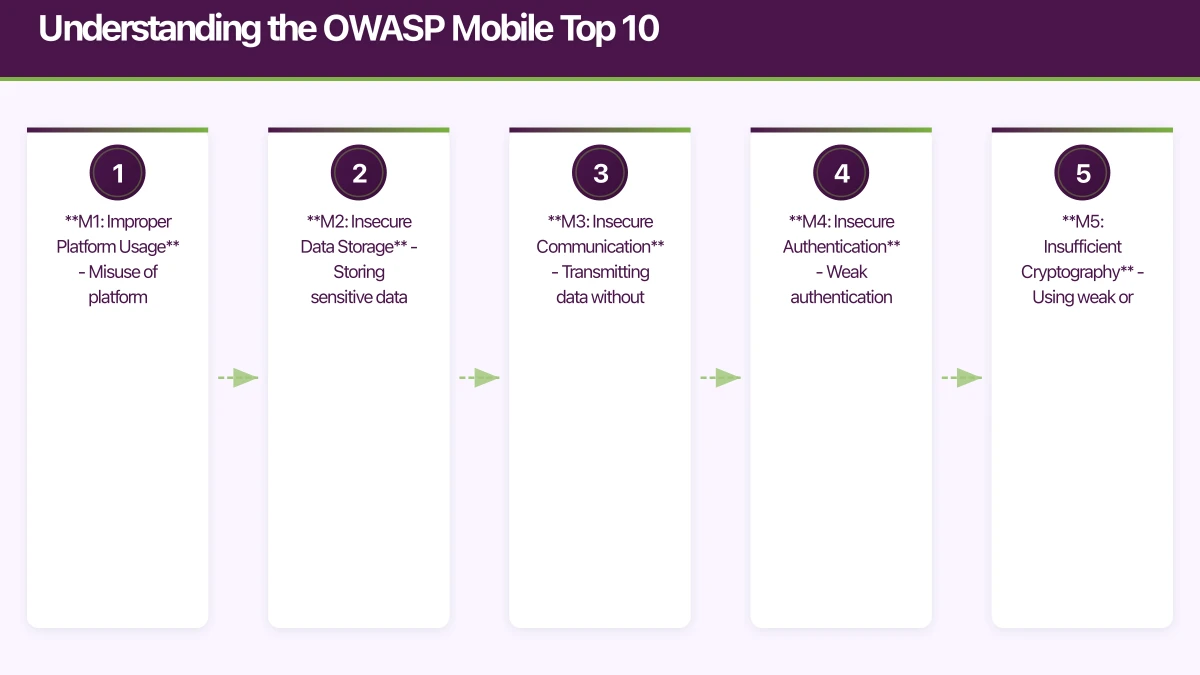
The Open Web Application Security Project (OWASP) Mobile Top 10 is the industry standard for mobile application security. Updated regularly to reflect emerging threats, the current list identifies the most critical security risks facing mobile applications.
The 2023 OWASP Mobile Top 10
- M1: Improper Platform Usage - Misuse of platform features or failure to use security controls
- M2: Insecure Data Storage - Storing sensitive data without proper protection
- M3: Insecure Communication - Transmitting data without encryption
- M4: Insecure Authentication - Weak authentication mechanisms
- M5: Insufficient Cryptography - Using weak or broken cryptography
- M6: Insecure Authorization - Poor authorization checks
- M7: Client Code Quality - Code-level vulnerabilities
- M8: Code Tampering - Lack of protection against reverse engineering
- M9: Reverse Engineering - Insufficient binary protections
- M10: Extraneous Functionality - Hidden backdoors or debug code in production
These aren’t theoretical risks. We’ve seen production apps leak authentication tokens through insecure storage, transmit payment data over unencrypted connections, and expose APIs without proper authorization. Let’s dive into how to prevent these vulnerabilities in your iOS and Android apps.
Secure Data Storage on
 iOS and Android
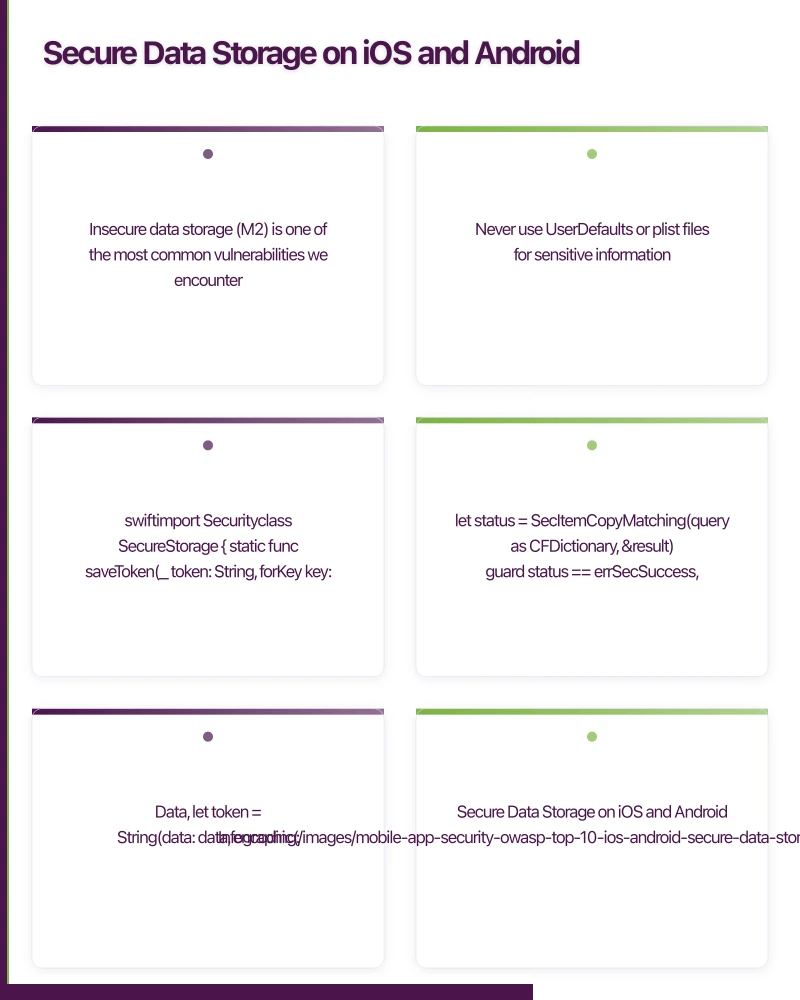
Insecure data storage (M2) is one of the most common vulnerabilities we encounter. Developers often store sensitive data in plain text files, shared preferences, or databases without encryption, making it trivial for attackers to extract user credentials, tokens, and personal information.
iOS: Keychain Services
On iOS, the Keychain is the only acceptable place to store sensitive data like authentication tokens, passwords, and encryption keys. Never use UserDefaults or plist files for sensitive information.
import Security

class SecureStorage {

    static func saveToken(_ token: String, forKey key: String) -> Bool {
        guard let data = token.data(using: .utf8) else { return false }

        // Delete any existing item
        let deleteQuery: [String: Any] = [
            kSecClass as String: kSecClassGenericPassword,
            kSecAttrAccount as String: key
        ]
        SecItemDelete(deleteQuery as CFDictionary)

        // Add new item
        let query: [String: Any] = [
            kSecClass as String: kSecClassGenericPassword,
            kSecAttrAccount as String: key,
            kSecValueData as String: data,
            kSecAttrAccessible as String: kSecAttrAccessibleWhenUnlockedThisDeviceOnly
        ]

        let status = SecItemAdd(query as CFDictionary, nil)
        return status == errSecSuccess
    }

    static func retrieveToken(forKey key: String) -> String? {
        let query: [String: Any] = [
            kSecClass as String: kSecClassGenericPassword,
            kSecAttrAccount as String: key,
            kSecReturnData as String: true,
            kSecMatchLimit as String: kSecMatchLimitOne
        ]

        var result: AnyObject?
        let status = SecItemCopyMatching(query as CFDictionary, &result)

        guard status == errSecSuccess,
              let data = result as? Data,
              let token = String(data: data, encoding: .utf8) else {
            return nil
        }

        return token
    }

    static func deleteToken(forKey key: String) -> Bool {
        let query: [String: Any] = [
            kSecClass as String: kSecClassGenericPassword,
            kSecAttrAccount as String: key
        ]

        let status = SecItemDelete(query as CFDictionary)
        return status == errSecSuccess
    }
}

// Usage
SecureStorage.saveToken("user_auth_token_here", forKey: "authToken")
if let token = SecureStorage.retrieveToken(forKey: "authToken") {
    // Use token for API calls
}
The kSecAttrAccessibleWhenUnlockedThisDeviceOnly flag ensures the data is only accessible when the device is unlocked and won’t be backed up to iCloud or transferred to new devices. For even higher security requirements, use kSecAttrAccessibleWhenPasscodeSetThisDeviceOnly.
Android: EncryptedSharedPreferences
On Android, EncryptedSharedPreferences (part of the Jetpack Security library) provides encrypted storage backed by hardware security modules on supported devices.
import android.content.Context
import android.content.SharedPreferences
import androidx.security.crypto.EncryptedSharedPreferences
import androidx.security.crypto.MasterKey

class SecureStorage(private val context: Context) {

    private val masterKey: MasterKey by lazy {
        MasterKey.Builder(context)
            .setKeyScheme(MasterKey.KeyScheme.AES256_GCM)
            .build()
    }

    private val encryptedPrefs: SharedPreferences by lazy {
        EncryptedSharedPreferences.create(
            context,
            "secure_prefs",
            masterKey,
            EncryptedSharedPreferences.PrefKeyEncryptionScheme.AES256_SIV,
            EncryptedSharedPreferences.PrefValueEncryptionScheme.AES256_GCM
        )
    }

    fun saveToken(key: String, token: String) {
        encryptedPrefs.edit().putString(key, token).apply()
    }

    fun retrieveToken(key: String): String? {
        return encryptedPrefs.getString(key, null)
    }

    fun deleteToken(key: String) {
        encryptedPrefs.edit().remove(key).apply()
    }
}

// Usage
val secureStorage = SecureStorage(context)
secureStorage.saveToken("authToken", "user_auth_token_here")
val token = secureStorage.retrieveToken("authToken")
Add the dependency to your build.gradle:
dependencies {
    implementation "androidx.security:security-crypto:1.1.0-alpha06"
}Critical: Never store sensitive data in regular SharedPreferences, SQLite databases without encryption, or external storage. We’ve seen apps that store JWT tokens in plain text SharedPreferences, making them accessible to any app with root access or backup tools.
Secure Networ
 k Communication
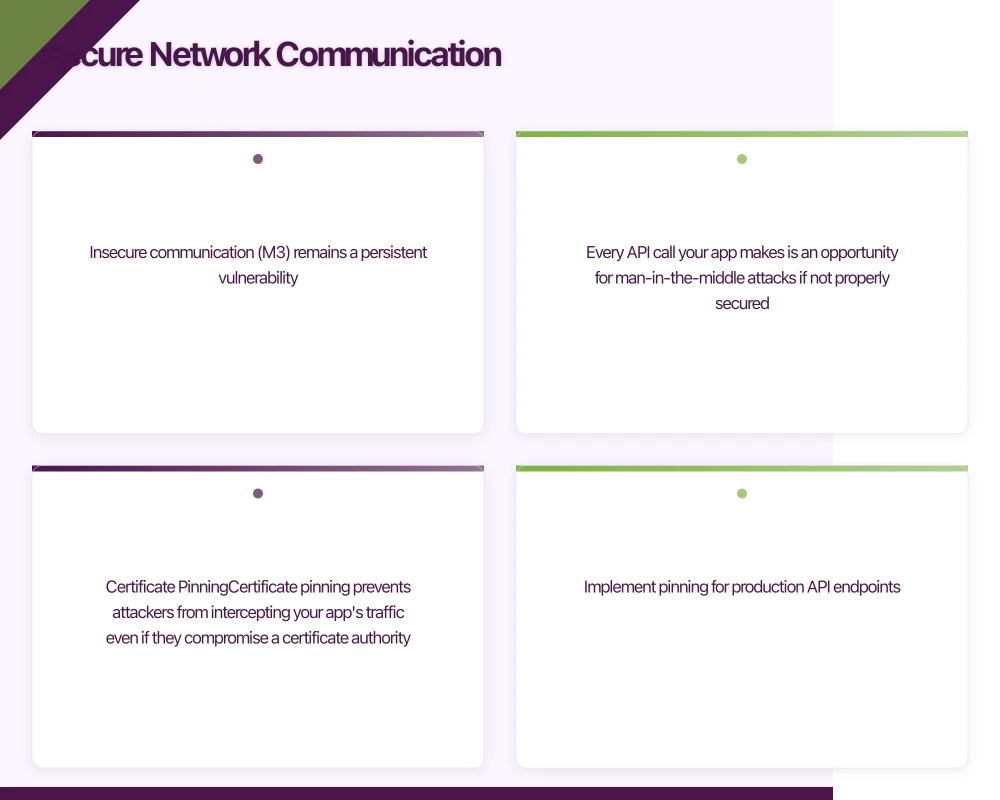
Insecure communication (M3) remains a persistent vulnerability. Every API call your app makes is an opportunity for man-in-the-middle attacks if not properly secured.
Certificate Pinning
Certificate pinning prevents attackers from intercepting your app’s traffic even if they compromise a certificate authority. Implement pinning for production API endpoints.
iOS with URLSession:
import Foundation

class NetworkManager: NSObject, URLSessionDelegate {

    // Your API's certificate public key hash (SHA256)
    private let pinnedPublicKeyHash = "YOUR_PUBLIC_KEY_HASH_HERE"

    lazy var session: URLSession = {
        let config = URLSessionConfiguration.default
        return URLSession(configuration: config, delegate: self, delegateQueue: nil)
    }()

    func urlSession(_ session: URLSession,
                    didReceive challenge: URLAuthenticationChallenge,
                    completionHandler: @escaping (URLSession.AuthChallengeDisposition, URLCredential?) -> Void) {

        guard let serverTrust = challenge.protectionSpace.serverTrust,
              let certificate = SecTrustGetCertificateAtIndex(serverTrust, 0) else {
            completionHandler(.cancelAuthenticationChallenge, nil)
            return
        }

        // Extract public key from certificate
        let policy = SecPolicyCreateSSL(true, challenge.protectionSpace.host as CFString)
        let trust = SecTrustCreateWithCertificates(certificate, policy, nil)
        let publicKey = SecTrustCopyPublicKey(serverTrust)

        // Get public key hash
        guard let publicKeyData = SecKeyCopyExternalRepresentation(publicKey!, nil) as Data? else {
            completionHandler(.cancelAuthenticationChallenge, nil)
            return
        }

        let publicKeyHash = sha256(data: publicKeyData)

        // Verify pin
        if publicKeyHash == pinnedPublicKeyHash {
            completionHandler(.useCredential, URLCredential(trust: serverTrust))
        } else {
            completionHandler(.cancelAuthenticationChallenge, nil)
        }
    }

    private func sha256(data: Data) -> String {
        var hash = [UInt8](repeating: 0, count: Int(CC_SHA256_DIGEST_LENGTH))
        data.withUnsafeBytes {
            _ = CC_SHA256($0.baseAddress, CC_LONG(data.count), &hash)
        }
        return hash.map { String(format: "%02x", $0) }.joined()
    }
}
Android with OkHttp:
import okhttp3.CertificatePinner
import okhttp3.OkHttpClient

class NetworkClient {

    private val certificatePinner = CertificatePinner.Builder()
        .add("api.yourdomain.com", "sha256/YOUR_PUBLIC_KEY_HASH_HERE")
        .add("api.yourdomain.com", "sha256/YOUR_BACKUP_KEY_HASH_HERE") // Backup pin
        .build()

    val client: OkHttpClient = OkHttpClient.Builder()
        .certificatePinner(certificatePinner)
        .build()
}

// Usage with Retrofit
val retrofit = Retrofit.Builder()
    .baseUrl("https://api.yourdomain.com")
    .client(NetworkClient().client)
    .addConverterFactory(GsonConverterFactory.create())
    .build()
To get your certificate’s public key hash:
# Extract from website
openssl s_client -connect api.yourdomain.com:443 | openssl x509 -pubkey -noout | openssl rsa -pubin -outform der | openssl dgst -sha256 -binary | openssl enc -base64Important: Always include a backup pin for when you rotate certificates. Without a backup pin, certificate rotation will break your app for existing users.
Network Security Configuration (Android)
Android’s Network Security Configuration provides declarative security settings:
{/* res/xml/network_security_config.xml */}
<?xml version="1.0" encoding="utf-8"?>
<network-security-config>
    <domain-config cleartextTrafficPermitted="false">
        <domain includeSubdomains="true">api.yourdomain.com</domain>
        <pin-set expiration="2025-01-01">
            <pin digest="SHA-256">YOUR_PUBLIC_KEY_HASH_HERE</pin>
            <pin digest="SHA-256">YOUR_BACKUP_KEY_HASH_HERE</pin>
        </pin-set>
    </domain-config>

    {/* Debug configuration - REMOVE IN PRODUCTION */}
    <debug-overrides>
        <trust-anchors>
            <certificates src="user" />
        </trust-anchors>
    </debug-overrides>
</network-security-config>
Reference it in your AndroidManifest.xml:
<application
android:networkSecurityConfig="@xml/network_security_config"
...>
</application>
``
`
## API Security and Authentication
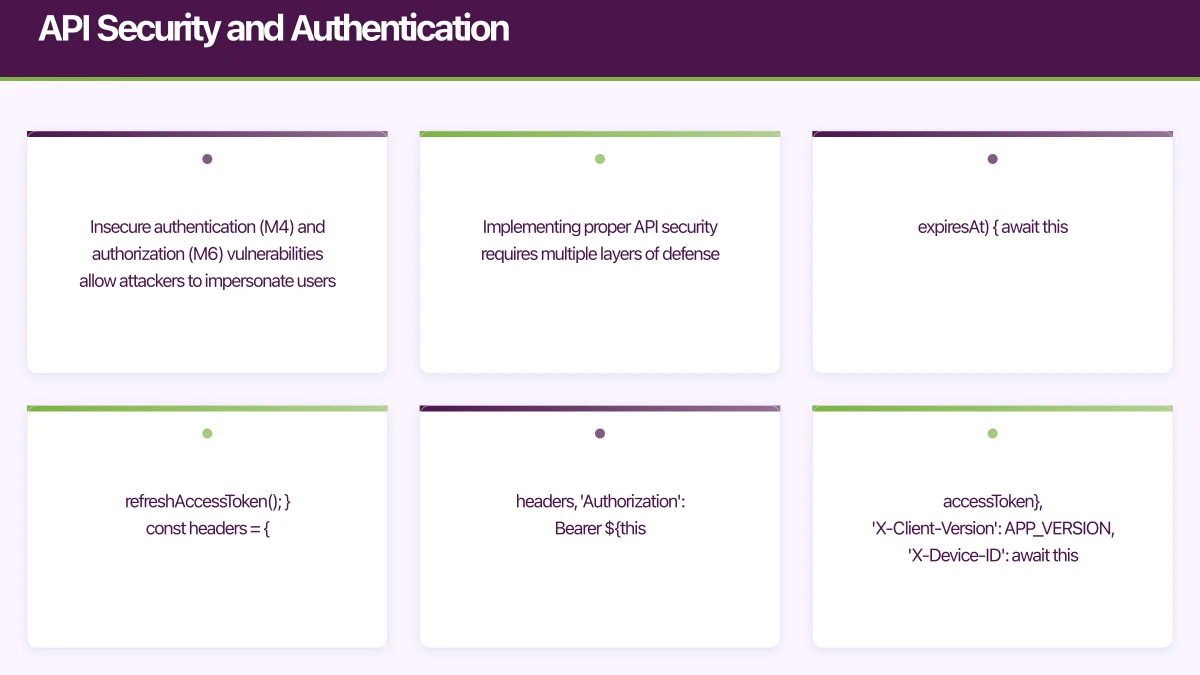
Insecure authentication (M4) and authorization (M6) vulnerabilities allow attackers to impersonate users or access unauthorized data. Implementing proper API security requires multiple layers of defense.
### Token-Based Authentication
Use short-lived access tokens with refresh tokens for session management:
```typescript
// Example API security architecture
interface AuthTokens {
accessToken: string; // Short-lived (15 minutes)
refreshToken: string; // Longer-lived (7 days)
expiresAt: number;
}
class APIClient {
private tokens: AuthTokens | null = null;
async makeAuthenticatedRequest(endpoint: string, options: RequestInit = {}) {
// Check if access token is expired
if (this.tokens && Date.now() >= this.tokens.expiresAt) {
await this.refreshAccessToken();
}
const headers = {
...options.headers,
'Authorization': `Bearer ${this.tokens?.accessToken}`,
'X-Client-Version': APP_VERSION,
'X-Device-ID': await this.getDeviceId()
};
const response = await fetch(endpoint, {
...options,
headers
});
if (response.status === 401) {
// Token invalid, refresh and retry once
await this.refreshAccessToken();
return this.makeAuthenticatedRequest(endpoint, options);
}
return response;
}
private async refreshAccessToken() {
const response = await fetch('/api/auth/refresh', {
method: 'POST',
headers: { 'Content-Type': 'application/json' },
body: JSON.stringify({
refreshToken: this.tokens?.refreshToken
})
});
if (response.ok) {
this.tokens = await response.json();
await this.storeTokensSecurely(this.tokens);
} else {
// Refresh failed, require re-authentication
this.tokens = null;
await this.clearStoredTokens();
throw new Error('Authentication expired');
}
}
}Rate Limiting and Request Signing
Implement client-side rate limiting and request signing to prevent abuse:
import CryptoKit

class SecureAPIClient {

    private let apiSecret: String
    private let rateLimiter = RateLimiter(maxRequests: 100, perSeconds: 60)

    init(apiSecret: String) {
        self.apiSecret = apiSecret
    }

    func makeRequest(endpoint: String, body: Data?) async throws -> Data {
        // Check rate limit
        try await rateLimiter.checkLimit()

        // Generate request signature
        let timestamp = String(Int(Date().timeIntervalSince1970))
        let nonce = UUID().uuidString

        var signatureData = Data()
        signatureData.append(endpoint.data(using: .utf8)!)
        signatureData.append(timestamp.data(using: .utf8)!)
        signatureData.append(nonce.data(using: .utf8)!)
        if let body = body {
            signatureData.append(body)
        }

        let signature = HMAC<SHA256>.authenticationCode(
            for: signatureData,
            using: SymmetricKey(data: apiSecret.data(using: .utf8)!)
        )
        let signatureHex = signature.map { String(format: "%02x", $0) }.joined()

        // Make request with signature headers
        var request = URLRequest(url: URL(string: endpoint)!)
        request.setValue(timestamp, forHTTPHeaderField: "X-Timestamp")
        request.setValue(nonce, forHTTPHeaderField: "X-Nonce")
        request.setValue(signatureHex, forHTTPHeaderField: "X-Signature")
        request.httpBody = body

        let (data, response) = try await URLSession.shared.data(for: request)

        guard let httpResponse = response as? HTTPURLResponse,
              (200...299).contains(httpResponse.statusCode) else {
            throw APIError.requestFailed
        }

        return data
    }
}

actor RateLimiter {
    private var requestTimestamps: [Date] = []
    private let maxRequests: Int
    private let timeWindow: TimeInterval

    init(maxRequests: Int, perSeconds: TimeInterval) {
        self.maxRequests = maxRequests
        self.timeWindow = perSeconds
    }

    func checkLimit() throws {
        let now = Date()
        let cutoff = now.addingTimeInterval(-timeWindow)

        // Remove old timestamps
        requestTimestamps = requestTimestamps.filter { $0 > cutoff }

        guard requestTimestamps.count < maxRequests else {
            throw APIError.rateLimitExceeded
        }

        requestTimestamps.append(now)
    }
}
Code Obfuscation and Anti-Tampering
Code tampering (M8) and reverse engineering (M9) are significant concerns for apps handling sensitive operations. While no protection is foolproof, multiple layers of defense raise the bar for attackers.
iOS: Code Obfuscation
For iOS, consider using tools like SwiftShield or implementing manual obfuscation for critical code paths:
// Example: Obfuscating API keys and sensitive strings
class SecurityConstants {

    // Never hardcode API keys directly
    static func getAPIKey() -> String {
        // Split and encode key parts
        let parts = ["aGVsbG8=", "d29ybGQ="]
        return parts.compactMap { part in
            guard let data = Data(base64Encoded: part),
                  let string = String(data: data, encoding: .utf8) else {
                return nil
            }
            return string
        }.joined()
    }

    // Use environment-specific keys retrieved from secure backend
    static func fetchAPIKey() async throws -> String {
        // On first launch, fetch API key from backend using device attestation
        // Store in Keychain, refresh periodically
        if let cachedKey = SecureStorage.retrieveToken(forKey: "api_key") {
            return cachedKey
        }

        let key = try await fetchKeyFromBackend()
        _ = SecureStorage.saveToken(key, forKey: "api_key")
        return key
    }
}
Android: ProGuard and R8
Configure ProGuard/R8 for code obfuscation and optimization:
# proguard-rules.pro

# Keep your public API
-keep public class com.yourapp.api.** { *; }

# Obfuscate everything else
-repackageclasses 'o'
-allowaccessmodification

# Remove logging in production
-assumenosideeffects class android.util.Log {
    public static *** d(...);
    public static *** v(...);
    public static *** i(...);
}

# Optimize
-optimizationpasses 5
-dontusemixedcaseclassnames

# Keep native methods
-keepclasseswithmembernames class * {
    native <methods>;
}

# Protect your security code
-keep class com.yourapp.security.** { *; }
Enable R8 in build.gradle:
android {
    buildTypes {
        release {
            minifyEnabled true
            shrinkResources true
            proguardFiles getDefaultProguardFile('proguard-android-optimize.txt'), 'proguard-rules.pro'
        }
    }
}
Root/Jailbreak Detection
Implement root and jailbreak detection for sensitive operations:
// Android root detection
class SecurityChecker(private val context: Context) {

    fun isDeviceRooted(): Boolean {
        return checkBuildTags() ||
               checkSuperuserApk() ||
               checkRootFiles() ||
               checkRootManagementApps()
    }

    private fun checkBuildTags(): Boolean {
        val buildTags = Build.TAGS
        return buildTags != null && buildTags.contains("test-keys")
    }

    private fun checkSuperuserApk(): Boolean {
        return try {
            context.packageManager.getPackageInfo("com.noshufou.android.su", 0)
            true
        } catch (e: PackageManager.NameNotFoundException) {
            false
        }
    }

    private fun checkRootFiles(): Boolean {
        val paths = arrayOf(
            "/system/app/Superuser.apk",
            "/sbin/su",
            "/system/bin/su",
            "/system/xbin/su",
            "/data/local/xbin/su",
            "/data/local/bin/su",
            "/system/sd/xbin/su",
            "/system/bin/failsafe/su",
            "/data/local/su"
        )

        return paths.any { File(it).exists() }
    }

    private fun checkRootManagementApps(): Boolean {
        val packages = arrayOf(
            "com.topjohnwu.magisk",
            "com.koushikdutta.superuser",
            "eu.chainfire.supersu"
        )

        return packages.any { packageName ->
            try {
                context.packageManager.getPackageInfo(packageName, 0)
                true
            } catch (e: PackageManager.NameNotFoundException) {
                false
            }
        }
    }
}
// iOS jailbreak detection
class JailbreakDetector {
static func isJailbroken() -> Bool {
return checkSuspiciousFiles() ||
checkSuspiciousApps() ||
checkWritePermissions() ||
checkCydiaURLScheme()
}
private static func checkSuspiciousFiles() -> Bool {
let paths = [
"/Applications/Cydia.app",
"/Library/MobileSubstrate/MobileSubstrate.dylib",
"/bin/bash",
"/usr/sbin/sshd",
"/etc/apt",
"/private/var/lib/apt/"
]
return paths.contains { FileManager.default.fileExists(atPath: $0) }
}
private static func checkSuspiciousApps() -> Bool {
guard let cydiaURL = URL(string: "cydia://package/com.example.package") else {
return false
}
return UIApplication.shared.canOpenURL(cydiaURL)
}
private static func checkWritePermissions() -> Bool {
let testPath = "/private/jailbreak.txt"
do {
try "test".write(toFile: testPath, atomically: true, encoding: .utf8)
try FileManager.default.removeItem(atPath: testPath)
return true
} catch {
return false
}
}
private static func checkCydiaURLScheme() -> Bool {
return UIApplication.shared.canOpenURL(URL(string: "cydia://")!)
}
}Security Testing and Validation
Security isn’t a one-time implementation - it requires continuous testing and validation throughout your development cycle.
Static Analysis Tools
Integrate static analysis into your CI/CD pipeline:
iOS:
- SwiftLint: Enforce Swift style and conventions
- Infer: Facebook’s static analyzer for iOS/Android
- MobSF: Mobile Security Framework for automated testing
Android:
- Android Lint: Built-in static analysis
- Infer: Cross-platform static analyzer
- QARK: Quick Android Review Kit
- MobSF: Comprehensive mobile security scanner
Dynamic Testing
Perform regular penetration testing:
- Network Traffic Analysis: Use Charles Proxy or mitmproxy to inspect all API calls
- Reverse Engineering: Attempt to decompile your own app with tools like Hopper (iOS) or jadx (Android)
- Runtime Analysis: Use Frida to hook into your app at runtime and test security controls
- Credential Testing: Verify tokens are properly secured and can’t be extracted
Security Checklist for Production
Before shipping your app, verify:
- All API calls use HTTPS with certificate pinning
- Sensitive data is stored in Keychain (iOS) or EncryptedSharedPreferences (Android)
- Authentication tokens expire and refresh properly
- Root/jailbreak detection is implemented for sensitive features
- Code is obfuscated with ProGuard/R8 (Android) or equivalent (iOS)
- No API keys or secrets are hardcoded in the app
- Logging is disabled or sanitized in production builds
- Input validation is performed on all user inputs
- Authorization checks are enforced server-side
- Debug functionality is completely removed from production builds
- Biometric authentication (Face ID/Touch ID, fingerprint) is implemented where appropriate
- Session timeout is configured appropriately for your app’s security requirements
Implementing Security in Your Development Workflow
Security needs to be part of your development process, not an afterthought. Here’s how to integrate security into your workflow:
Security-First Development Practices
- Threat Modeling: Before implementing features, identify potential security risks
- Secure Code Reviews: Include security-focused reviews for all code changes
- Dependency Scanning: Regularly audit third-party libraries for vulnerabilities
- Automated Security Testing: Run security tests on every build
- Incident Response Plan: Have a plan for responding to security vulnerabilities
Staying Current with Security Best Practices
The mobile security landscape evolves rapidly. Stay informed through:
- OWASP Mobile Security Project: Regular updates to the Mobile Top 10
- Platform Security Guides: Apple’s iOS Security Guide and Android’s Security Best Practices
- Security Bulletins: Monitor CVE databases and platform-specific security updates
- Community Resources: Follow mobile security researchers and tools like MobSF
Key Takeaways
Mobile app security is complex, but focusing on the OWASP Mobile Top 10 provides a solid foundation. The core principles we’ve covered:
- Never trust the client: All security decisions must be validated server-side
- Defense in depth: Layer multiple security controls (encryption, obfuscation, detection)
- Secure by default: Use platform security features like Keychain and EncryptedSharedPreferences
- Encrypt everything in transit: HTTPS with certificate pinning for all network communication
- Test continuously: Security testing should be part of your CI/CD pipeline
Security isn’t about achieving perfect protection - it’s about raising the cost of attacks high enough that attackers move on to easier targets. By implementing these practices, you’re building apps that protect your users’ data and maintain their trust.
The code examples in this guide provide a starting point, but security is an ongoing commitment. Review your implementation regularly, stay current with platform updates, and consider engaging security professionals for penetration testing before major releases. Your users trust you with their data - make sure your app architecture reflects that responsibility.
Need help implementing security in your mobile app? At eawesome, we build security-first mobile applications for Australian startups. Our team has shipped over 50 apps with robust security architectures for iOS and Android. Get in touch to discuss your project’s security requirements.
How does your app strategy fit into long-term digital transformation? Ash Ganda writes about the frameworks that connect mobile innovation to business outcomes.
Ashish Ganda is the founder of Ganda Tech Services, a Sydney-based technology consultancy helping Australian businesses grow through cloud, web, and mobile solutions.
Talk to a Sydney app developer — free.
30 minutes. We'll tell you what your app needs, how long it takes, and what it costs. Real answers, no sales pitch.
Book Free App Strategy Call →Free · 30 minutes · No obligation